

Shared knowledge leads to accumulated knowledge |
| |||||||||
cCSVWinprint2by Bob Worsley
CSV Subclass for WinPrint2by Bob Worsley OverviewOne of the items missing from WinPrint2 is an easy way to output to a file instead of always to the printer or print preview. The parameter OUTPUT_TO_FILE exists in the packages, but is not documented very well and currently only applies to Crystal Report usage. There are two subclasses contained in this "upgrade", one for cWinPrint2 that will write the actual output, and the other to the ReportView class that will add a third radio button to the "Send Report To" radio buttons, add a field for the output file name and also a checkbox for immediately showing the results in the spreadsheet of your choice. Modifying an existing WinReport is quite simple, just a few steps. It is assumed here that you will be modifying a report that's been generated by the Report Wizard. Modifying a more exotic report shouldn't be a problem, it will simply require a bit more thought since most of the individual pieces are the same RequiredThe vWin32fh.pkg file from vdf-guidance.com is required for this change. This a package that contains numerous Windows API calls. In this case we will use it to open the output file. ExampleThe VDF example report, "Contact List" has been modified and included in this project to show where and how to modify your reports. Search on "CSV" to find all of the changes in the report. Modifying your report1. Use the two packages from the zip at the very top of your report before the ReportView.
3. Change the cWinReport2 class to cCSVWinReport2 4. Replace the oPrintTo object and the three buttons in your report with the following code and adjust the size/position with the designer mode of the Studio. Keep in mind that you don't want to make the container too much narrower than it is or the complete output path and file name might not show. You will probably need to widen the original report view. Note that you will only see the container, the child objects will not be rendered in the Studio - this is expected behavior.
    Object oPrintContainer is a cPrintContainer
        Set Size to 92 223
        Set Location to 45 8
    End_Object
5. If you require any kind of preprocessing in the "Print" button just prior to calling StartReport, cut it out of the button and add it to a procedure named "DoPreProcess" that should be added to the ReportView. There's also a stub for DoPostProcess - see the example for placement.
6. In procedure StartReport, comment out any lines of code between your selection property settings and the call for SendReport. This will probably only be a couple of lines pertaining to IsToPrinter. 7. Replace the items in #6 with the following. a. One sOutputHeaderString[] line for each of the report column headers b. Call to replace the class property array with the local array that now holds the column header text c. Forward Send StartReport
Handle hoReport
Get Report_Object_Id to hoReport

       // Populate the CSV header fields, one for each data field
       Move "Hdr Text1"     to sOutputHeaderString[0]  // One for each column header
       Move "Hdr Text2"     to sOutputHeaderString[1]  // Etc.

       Set psOutputHeaderString of hoReport to sOutputHeaderString

       Forward Send StartReport to hoReport
8. In the body procedure you will need to check what output mode you are using. Any current code, including calls for subtotaling is the original "Printer" code. Any calculations or logic that is necessary for an output field should go outside the conditions.
Integer iToPrinter
Get piPrintSelection to iToPrinter

If (iToPrinter <> 2) Begin
	// Your original "Printer" code goes here
Else Begin
	// Output for the CSV data fields goes here
     Writeln channel (piChannelOut(Self)); ('"'+Trim(MyFile.MyField1)+'","'+String(MyFile.MyField2)+'"')
End
9. And one last thing. If there are selection items in your report that should not be made accessible or must be changed if you're outputting a CSV file, create a procedure DoCheckSelection in the ReportView and put your settings or calls there. This would be something like setting/shadowing checkboxes or blanking out and shadowing an entry field.
That's it. Run the report and once you've made your selection changes, click the CSV button and you will see the following 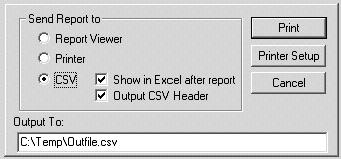 If you do not have Excel installed on your PC then you would expect to see the CSV file shown in whatever is defined for a file type of "csv". This could even be Notepad.
EnhancementThere are two settings in the cCSVReportview class that could be added to a system file and made available to the customer. 1. Output directory for CSV files The default is to c:\temp but that might not be acceptable. Search on "Sysfile" and uncomment the code that lets you set the directory from a system file field. 2. Whether to ask which printer or just print to the default This is unrelated to the CSV modifications and is provided just beause. Normally a report will ask what printer to print to, but a print mode setting is available that will not pop up the printer dialog and just run the report to the default printer. This can also be exposed in a system file setting. In the class it is coded to "N". DownloadSeptember, 2009 - Minor bug fix for changing output file name from the report view and adjusted sizes for VDF-15. SubversionThe latest version of the class can be retrieved from our subversion server at: http://svn.vdf-guidance.com/cCsvWinReport2/trunk/ |
||||||||||
|
||||||||||
Copyright © 1999 - 2025 VDF-GUIdance on all material published, for details see our Disclaimer. |
||||||||||
